
You've changed the dressing, helped your relative turn, and checked the sore again. It still looks much the same, and you're wondering whether the mattress is wrong, the dressing needs changing, or you're missing something important. The nurse beside you needs the same answer: is the current plan protecting the tissue and producing measurable healing?
Good care of pressure ulcers starts with that question, not with a particular dressing or a rigid turning clock. A workable home plan must account for skin response, pain, mobility, equipment, and what the caregiver can safely manage. It also needs clear reasons to call for help rather than repeat care that isn't working.
## Table of Contents - Stage the Wound and Set a Baseline - Name the depth before choosing treatment - Establish the starting point today - How to Measure and Recheck the Wound - Make each check repeatable - Turn observations into a usable record - Repositioning and Support Surfaces at Home - Make the position do the work - Design for the household you actually have - Skin Moisture Nutrition and Pain Habits - Make skin care gentle and prompt - Feed repair and make movement tolerable - Local Dressing Care Between Checks - Use a clear dressing routine - Know what not to improvise - Escalate to Specialty Review When Healing Stalls - Use findings rather than a waiting period - Bring evidence the specialist can use
Stage the Wound and Set a Baseline
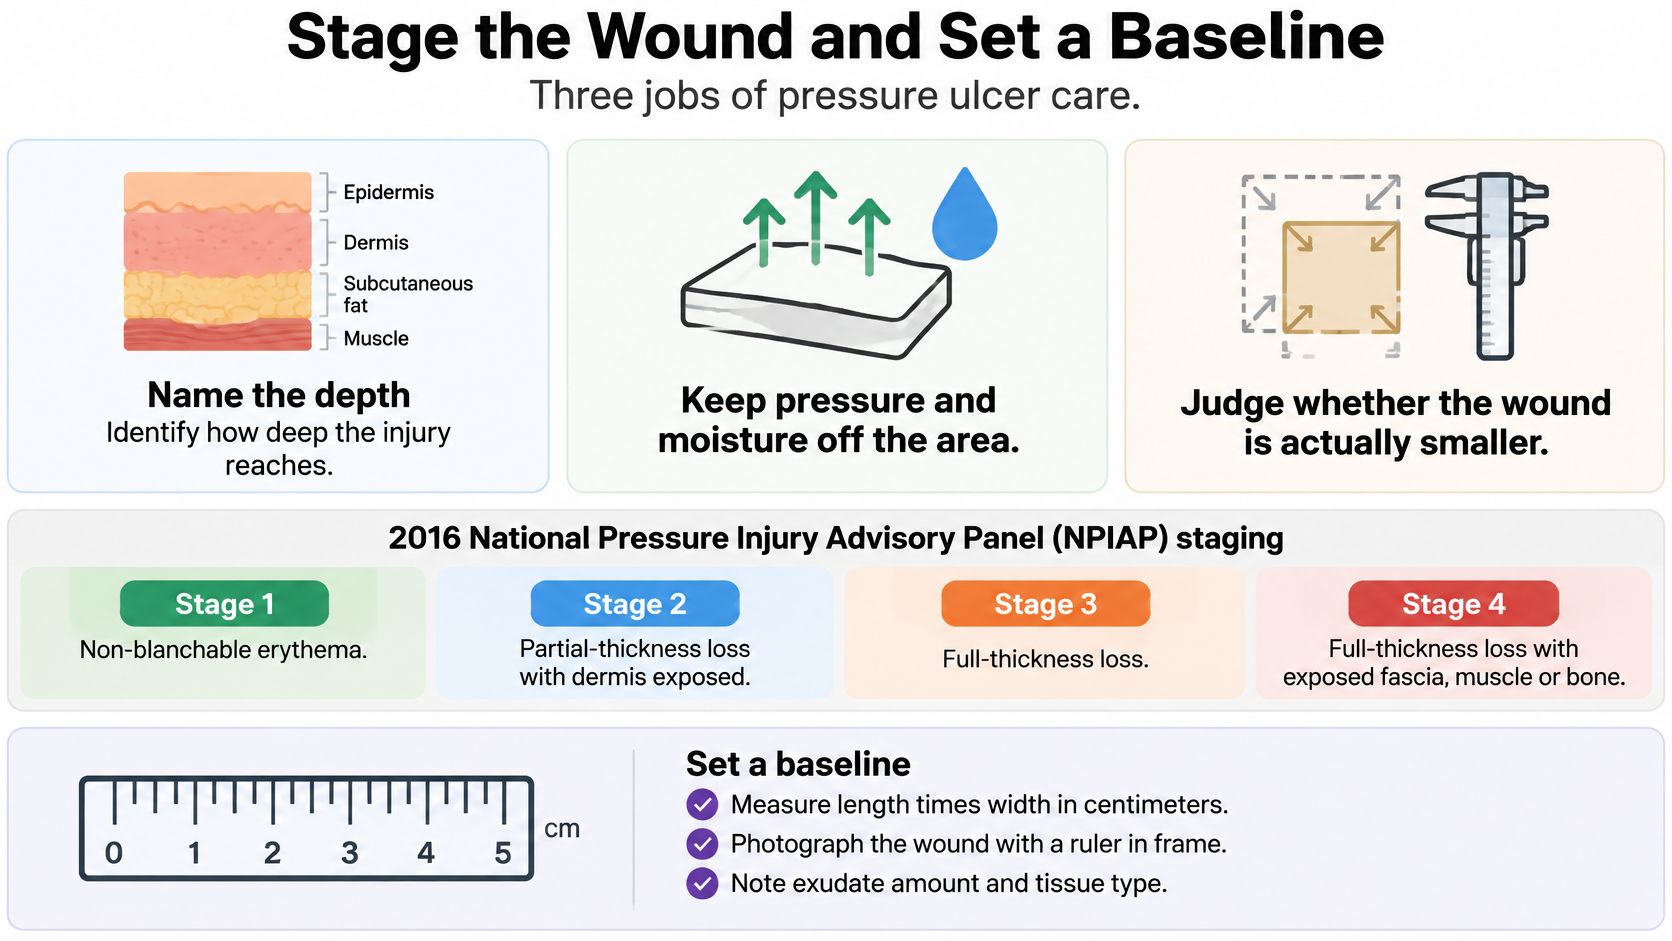
Pressure injury stage and what care changes
| Category | What you see | Immediate care focus | Specialty review |
|---|---|---|---|
| Stage 1 | Intact skin with non-blanchable redness | Offload now and recheck within hours | If discoloration persists or skin opens |
| Stage 2 | Partial-thickness loss, blister, or shallow open area | Balance moisture, offload, and measure | If it isn't getting smaller with consistent care |
| Stage 3 | Full-thickness loss into fat, without exposed fascia, muscle, tendon, cartilage, or bone | Full local care, nutrition support, and serial measurement | Yes, if stalled, undermined, or infected |
| Stage 4 | Full-thickness loss with exposed fascia, muscle, tendon, cartilage, or bone | Protect exposed structures and escalate | Yes, promptly |
| Unstageable | Slough or eschar obscures the base enough to prevent assessment of depth | Don't guess the stage or cut tissue at home | Yes |
| Deep tissue injury | Persistent non-blanchable deep red, maroon, or purple discoloration | Completely offload and watch for changes | If it opens, darkens, or worsens |
These categories follow the National Pressure Injury Advisory Panel's 2016 staging framework. Use the table to describe what you're seeing, then have the treating clinician confirm the category. Stage describes tissue depth, not how much the wound hurts.
A person with reduced sensation may have a deep wound without reporting pain. Conversely, a shallow injury can be very painful. Don't use comfort alone to decide whether the wound is minor.
Name the depth before choosing treatment
Care has three jobs: identify the depth, protect the area from pressure and excess moisture, and determine whether healing is progressing. Choosing a dressing before understanding the wound can leave an important problem untreated.
Not every sore near the buttocks is a pressure injury. Incontinence-related skin damage, friction injury, and other wounds can resemble superficial pressure damage, so uncertainty about the cause deserves clinical assessment. A blister should not automatically receive a pressure-injury label.
On darker skin, redness may be difficult to see. Compare the area with nearby skin and check for unusual warmth, firmness, swelling, or tenderness. A persistent color change over a pressure point matters even when it doesn't look bright red.
This visual summarizes the staging categories and baseline tasks.
Establish the starting point today
A 2020 systematic review and meta-analysis of hospitalized adults estimated pooled pressure-injury prevalence at 12.8% among 1,366,848 patients. That hospital finding isn't a prediction for your family member, but it reinforces why skin assessment shouldn't wait until a wound looks severe.
Before changing the care plan, record the wound's location, appearance, dimensions, drainage, and surrounding skin condition. Take a photograph with permission and store it through the care team's approved method. Record what equipment and positions the person currently uses, too.
- Confirm the diagnosis. Ask the nurse to distinguish pressure damage from moisture-related or other skin injury.
- Document the category. Put the clinician-confirmed stage or category on the care sheet so everyone uses the same description.
- Protect uncertain tissue. Leave black or brown tissue alone until a clinician assesses it. Stable, dry heel eschar especially requires assessment before anyone considers removal.
- Name the responsible clinician. The caregiver should know who reviews changes and how to reach that person.
Practical rule: A wound description that everyone can repeat is more useful than a dressing choice nobody can explain.
How to Measure and Recheck the Wound
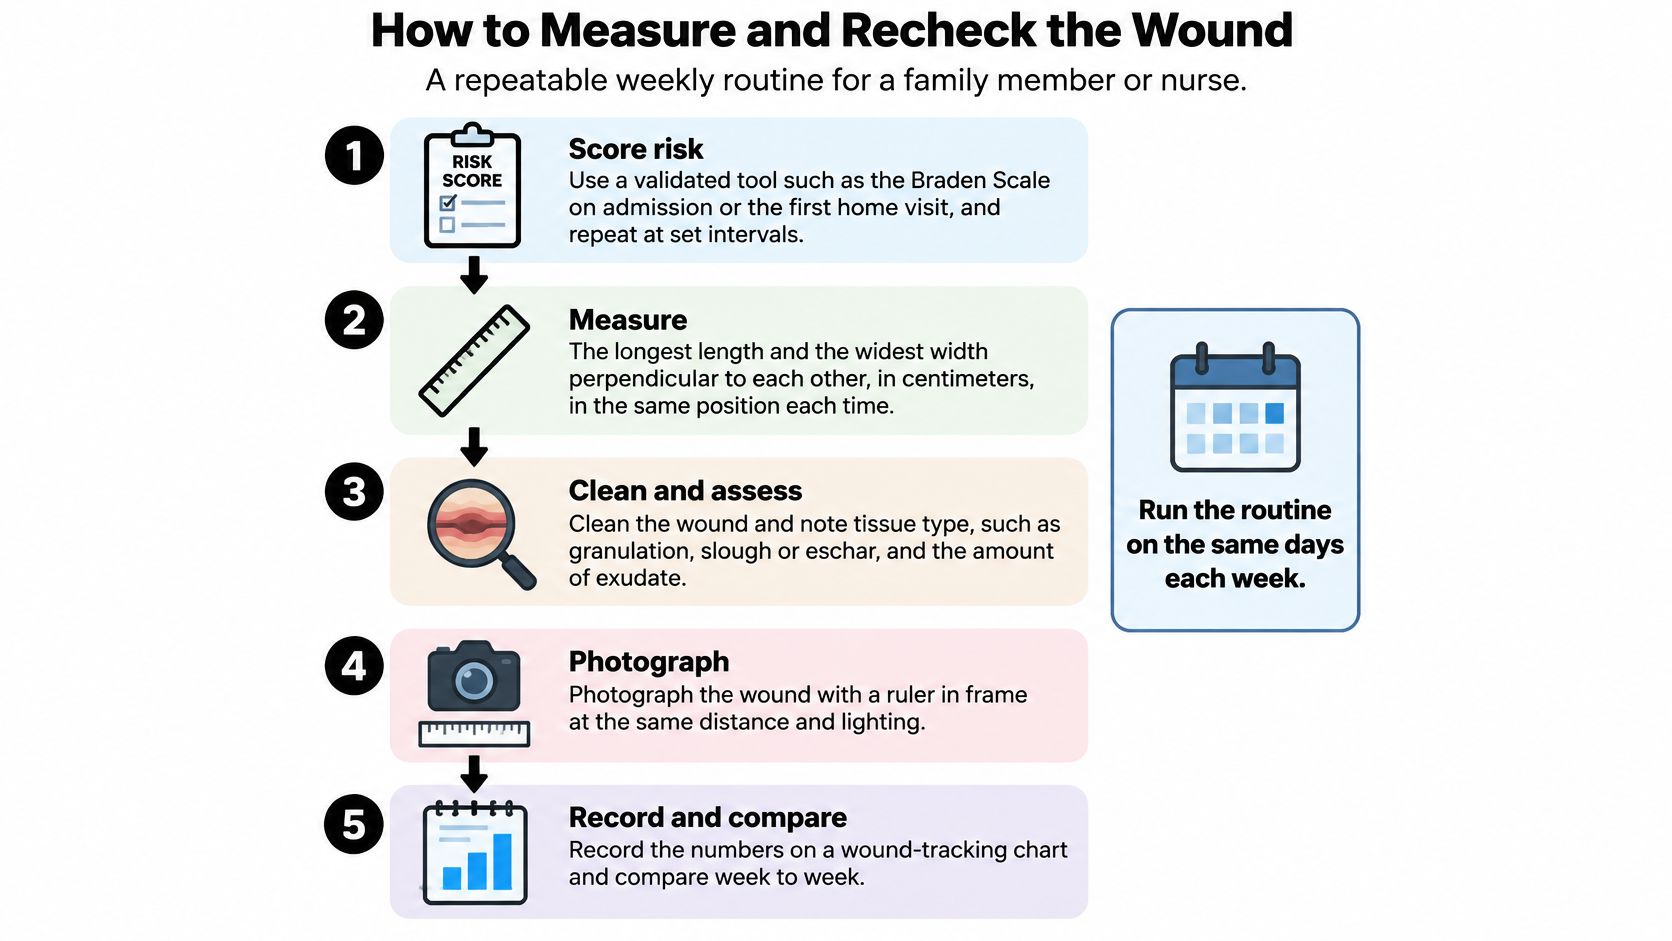
Use a repeatable routine, not a fresh guess at every dressing change. Arrange formal measurements on consistent care days, while checking for deterioration whenever care exposes the area. Don't remove an otherwise intact dressing solely to satisfy a photograph schedule unless the treatment plan calls for it.
Keep the equipment together: a disposable centimeter ruler, the wound record, approved cleansing supplies, and a camera or secure clinical imaging device. Use the same body position each time because stretching or folding the skin changes the apparent opening.
The routine below helps caregivers and nurses collect comparable information.
Make each check repeatable
- Review risk. Have the nurse use a validated tool such as the Braden Scale, and reassess when mobility, continence, intake, or health changes. A risk score supports judgment; it doesn't replace looking at the skin.
- Inspect beyond the existing wound. Check pressure points from head to heels, including beneath devices and around briefs. On intact discolored skin, the clinician can assess blanching and compare temperature and firmness with surrounding tissue.
- Measure consistently. Record the longest length and the widest perpendicular width in centimeters. Depth and undermining should be measured by a trained clinician using appropriate technique. Common slip: measuring diagonally one day and straight across the next creates an apparent change that may not be real.
- Photograph with a reference. Keep lighting, distance, camera angle, and body position consistent, with a ruler beside the wound. Don't place an ordinary reusable ruler inside it. The guide to wound photography and measurement provides additional context for documenting images.
- Record more than size. Note tissue appearance, drainage amount and color, odor after cleansing, surrounding skin changes, and pain at rest and during care. Describe what changed rather than writing only looks better.
- Compare the whole wound. Smaller dimensions are encouraging, but depth, undermining, tissue quality, and skin condition also matter. Common slip: calling a narrowing opening healed while a cavity remains beneath it.
Turn observations into a usable record
A photograph can show color and shape, but it can't reliably establish depth or rule out infection. Measurements also have some variability, so the nurse should interpret the trend rather than overreacting to a tiny isolated difference.
For a visual demonstration to discuss with your nurse, use this video alongside hands-on instruction.
Keep descriptions factual and brief. Write drainage reached dressing edge rather than a lot, and pain increased during left-side positioning rather than uncomfortable. These details help the next caregiver understand what happened.
Log line: Date | clinician-confirmed stage | length × width × depth | drainage and tissue appearance | position used | pain | smaller, unchanged, or larger.
Repositioning and Support Surfaces at Home
A fixed two-hour turning schedule isn't a cure. The interval has to fit tissue tolerance, mobility, medical condition, the support surface, comfort, and treatment goals.
The international pressure-injury quick-reference guidance describes a pooled analysis of three trials involving 1,074 participants that did not establish superiority of two-hourly over four-hourly repositioning, with a risk ratio of 1.06 and a 95% confidence interval of 0.80–1.41. It also recommends repositioning people at risk regardless of support-surface type and describes small seated weight shifts approximately every 15 minutes for people able to perform them.
That uncertainty does not mean leaving someone in the same position is safe. It means the nurse should prescribe a starting plan and revise it from observed results.
Starting repositioning plan by situation
| Situation | Starting interval or approach | If skin or tolerance worsens |
|---|---|---|
| In bed, can be turned, standard surface | Clinician-selected interval based on tissue tolerance and assistance available | Shorten the interval and assess a pressure-redistributing mattress |
| In bed on an advanced mattress | Continue individualized turns | Increase frequency and reassess positioning if discoloration appears |
| Sitting and able to shift weight | Frequent small weight shifts using the prescribed seating technique | Fully offload and check cushion fit if discoloration persists |
| Sitting and unable to shift | Assisted repositioning with a prescribed sitting limit | Check after sitting and shorten chair time |
| Heel injury or high-risk heels | Float heels completely clear of the mattress | Adjust support or use a fitted heel-offloading device |
| Turns cause severe pain or disrupt sleep | Maintain pressure relief while the clinician adjusts timing, position, and pain treatment | Request review when pain prevents effective offloading |
Make the position do the work
A turn only counts if it unloads the injured area. Someone can be technically on their side while a sacral wound remains pressed against the mattress. Have the nurse demonstrate the position and then watch the caregiver reproduce it.
Lift or use an appropriate slide sheet rather than dragging. Support the person with positioning wedges or pillows without putting the support directly beneath the ulcer. For heel offloading, support the lower leg so the heel remains free, and check that the arrangement hasn't created another pressure point.
Document the position, tolerance, and skin response, not just turned. Persistent non-blanchable discoloration after unloading is a reason to reassess both the position and equipment, not proof that the next scheduled turn will solve the problem.
Design for the household you actually have
The NICE patient and caregiver guide identifies repositioning, pressure-redistributing equipment, and caregiver information as practical parts of prevention and treatment. At home, that requires an honest assessment of body size, contractures, transfers, wheelchair use, continence, and available help.
- Unsafe solo turns. Request equipment assessment, training, or additional assistance rather than attempting a maneuver the caregiver can't control.
- Severe pain. Change the technique and seek clinical review; don't force the movement or abandon offloading.
- Sleep disruption. Discuss a tolerable overnight plan. Don't lengthen intervals independently because a new mattress feels softer.
- Wheelchair dependence. Have seating and cushion fit assessed, including posture and whether the person can perform an effective weight shift.
The best turning plan is one the caregiver can perform safely and the person's skin can tolerate.
Skin Moisture Nutrition and Pain Habits
A person spends the afternoon sliding down a recliner, eats little dinner, and needs repeated brief changes overnight. Even careful bed positioning won't address everything affecting that wound. Daily care has to include the sitting posture, skin exposure, food intake, and pain that make pressure relief possible.
Keep the wound bed appropriately moist while protecting surrounding skin from excess moisture. Those aren't contradictory instructions. The dressing manages the wound environment; continence care protects intact skin from urine, stool, and prolonged dampness.
Make skin care gentle and prompt
Clean soiled skin with a gentle cleanser, pat dry, and replace wet or soiled briefs promptly. Apply the prescribed barrier film or cream to the intended intact skin, using the amount specified for that product. Thick, repeatedly layered applications can make inspection and cleansing harder.
Don't massage reddened pressure points. Separate knees and ankles with suitable positioning support so one bony surface doesn't press against another. Keep bedding smooth and remove objects or tubing trapped beneath the person.
- Manage the recliner slide. Ask for a seating and transfer assessment rather than repeatedly pulling the person upright. A suitable cushion, supported posture, and assisted stand or prescribed tilt may be needed.
- Notice skin changes. Record whitening or softening around the wound edge, irritation from adhesive, and damage associated with continence episodes.
- Keep supplies reachable. A prepared bedside continence kit makes prompt care more realistic, particularly overnight.
Feed repair and make movement tolerable
Offer enough food and protein-containing meals to support the individualized nutrition plan. Record poor intake, unfinished meals, swallowing difficulty, or unintended weight loss for the clinician or dietitian. Don't guess supplement doses, especially when kidney disease, fluid restrictions, or other dietary limits apply.
Use prescribed pain medicine before turns or dressing changes when the existing order allows it. Watch for grimacing, guarding, withdrawal, or agitation when the person can't describe pain. Stop an unsafe technique and get help modifying it.
Moisture exposure and missed meals can undermine an otherwise careful offloading plan.
Add to the daily record: continence episodes, roughly how much food was eaten, and pain during repositioning.
Local Dressing Care Between Checks
Dressings support the wound bed; they don't remove the pressure causing injury. Choose them according to wound depth, tissue condition, drainage, surrounding skin, and the caregiver's ability to apply them correctly. The most absorbent or expensive product isn't automatically the right one.
A useful dressing plan names the product, cleansing method, change criteria, and what to do if the dressing leaks or becomes contaminated. Keep those instructions beside the supplies. A broad overview of advanced wound care can help frame discussions about treatment options, but it doesn't replace wound-specific orders.
Use a clear dressing routine
- Confirm the product and purpose. Record the prescribed dressing name and whether it is intended to absorb drainage, protect fragile tissue, or provide another specific function.
- Clean as instructed. Wash hands, prepare a clean work area, and use the prescribed cleansing solution and technique. Don't scrub the wound to make it look cleaner.
- Secure without added pressure. Check that edges remain attached and the dressing doesn't bunch beneath the person during turns.
- Check for leakage. Look during routine care for drainage reaching the outside, wetness, stool contamination, or lifting edges. Follow the plan for early replacement.
- Inspect the surrounding skin. Report new redness, softened white edges, blistering, or adhesive injury.
- Avoid unprescribed additions. Don't apply household antiseptics, heat, creams, powders, or ointments beneath the dressing unless ordered.
- Document the change. Note the date, dressing condition, drainage appearance, skin findings, and anything that made care difficult.
Know what not to improvise
Don't pack a cavity unless the clinician has prescribed the material and taught the technique. Overpacking can add pressure, while loose or unaccounted-for material creates other problems. The person responsible for dressing changes should know what was placed and what must be removed.
Leave slough and eschar removal to clinicians. Pulling at adherent tissue or cutting it at home can injure viable tissue or cause bleeding, and some wounds need circulation assessment before removal is considered.
Repeated leakage means the plan needs review, not more tape. Likewise, a dressing that repeatedly pulls skin off at removal needs a different securing approach. Record the practical failure so the nurse can change the plan rather than repeatedly treating the resulting irritation.
Escalate to Specialty Review When Healing Stalls
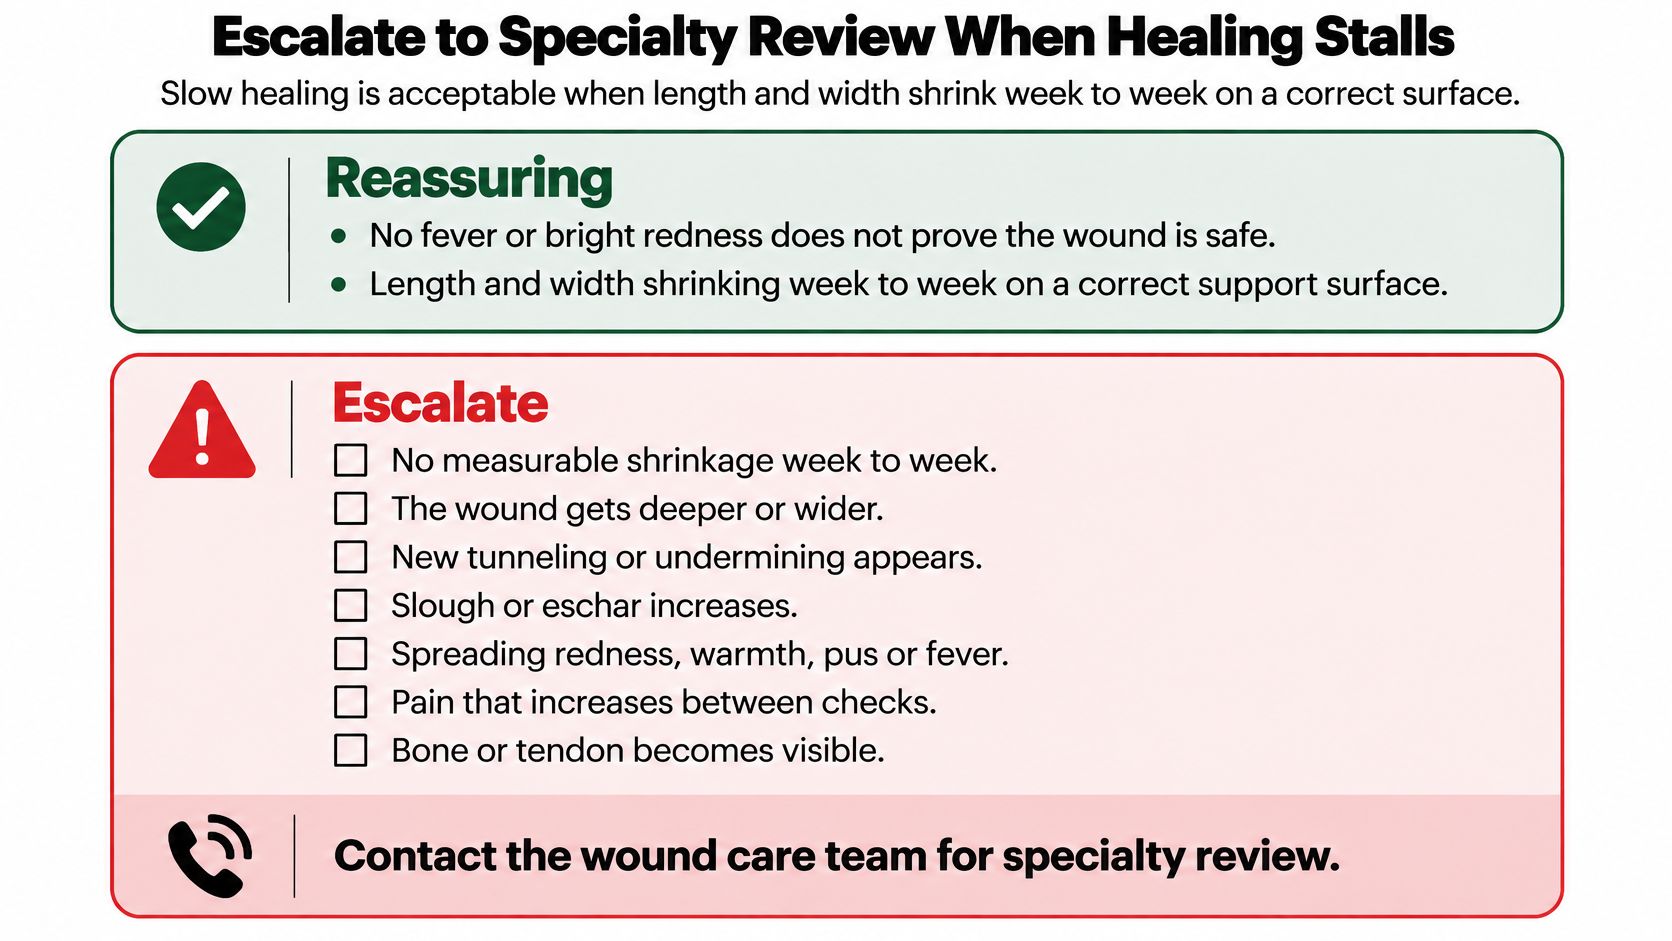
Continue a tolerable plan when serial assessments show healing and the surrounding skin remains protected. Request specialty review when the wound stops progressing, becomes deeper, or develops concerning tissue changes. Don't wait for fever to decide that a wound deserves attention.
MedlinePlus guidance on caring for pressure sores emphasizes worsening wounds, infection signs, drainage, dressing care, and contacting the treating clinician. A quiet-looking wound can still require escalation when the depth, undermining, exposed structures, or repeated breakdown suggests more than a surface problem.
Use findings rather than a waiting period
There isn't a universal waiting period that makes every stalled wound suitable for referral. Set a reassessment point with the treating clinician, and request review if comparable measurements repeatedly show no reduction despite a workable care plan. Any deterioration overrides the planned review date.
Findings that mean the care plan is failing
| Finding | What it suggests | Next step |
|---|---|---|
| No measurable size reduction across serial checks despite correct offloading | The conservative plan may be insufficient or an underlying problem remains | Specialty review with photographs and the measurement log |
| Black, brown, or leathery dead tissue | Necrosis may obscure the base | Don't cut it at home; a clinician decides whether removal is appropriate |
| Persistent undermining or tunneling | Damage extends beneath the visible opening | Clinician measurement and specialist assessment |
| Exposed tendon or bone | Deep, high-risk injury | Prompt specialty evaluation; newly exposed bone needs same-day local assessment |
| New odor, increased drainage, or recurrent cellulitis | Possible infection or another change requiring assessment | Same-day clinical contact |
| Wound closes, then breaks down again | Recurrent injury or unresolved contributing factors | Reassess equipment, loading, nutrition, and referral needs |
| Slough that doesn't clear | Stalled tissue or uncertain depth | Clinical assessment rather than home scrubbing |
| Minimal improvement despite appropriate care | A different level of evaluation may be needed | Escalate without assuming surgery is inevitable |
Use this checklist alongside the written record when discussing referral.
Bring evidence the specialist can use
Send the measurement trend, dated photographs, dressing record, turning positions, equipment details, pain observations, and nutrition concerns. For someone with paralysis, diabetes, poor circulation, cognitive impairment, or limited communication, these observations are particularly important because reported pain may not reflect severity.
The specialist assesses circulation, infection, dead tissue, exposed structures, wound geometry, and whether the current plan is feasible. Virtual assessment can help review history and images before travel, but photographs don't replace hands-on examination when deeper findings need confirmation.
At Wound Services, our escalation pathway addresses these findings without requiring an automatic move to surgery. Our care team includes Chief Clinical Officer Chelsea O'Connell, APRN, FNP-C, an Advanced Wound Care Specialist Nurse Practitioner. When surgery is appropriate, recommendations and follow-up return to the existing care team, with virtual follow-up tracking the wound toward closure.
Seek same-day local care for fever, rapidly spreading redness, or newly exposed bone. If the person becomes confused, severely unwell, or difficult to wake, seek emergency help rather than waiting for a routine wound appointment.
---
Wound Services offers virtual and in-person evaluation of complex, stalled, and recurrent pressure injuries in the Washington, DC area, with procedures at its ambulatory surgical center when clinically appropriate. Visit Comprehensive Wound Services to request an evaluation, and bring the wound photographs, measurement log, and current care plan so our team can coordinate recommendations with your existing clinicians.